Integrating FastAPI with Keycloak for Authentication
Simple Guide to Connecting FastAPI with Keycloak for Authentication using Python, Poetry, and Docker

In this article, we’ll explore how to secure a FastAPI application using Keycloak as the authentication provider. We’ll walk through setting up the FastAPI application, managing dependencies with Poetry, integrating it with a production-ready Keycloak server, and testing the authentication flow. This guide assumes that you already have a Keycloak server up and running.
Introduction
FastAPI is a modern, high-performance web framework for building APIs with Python. Keycloak is an open-source identity and access management solution that adds authentication to applications and secure services. By integrating Keycloak with FastAPI, you can implement robust authentication and authorization without building it from scratch.
Prerequisites
- Python 3.12+: Ensure you have Python installed.
- Poetry: For dependency management.
- Docker and Docker Compose: This is used to containerize the application.
- Git: For cloning the repository.
- Existing Keycloak Server: A production-ready Keycloak server configured with the necessary realm, client, and users.
- Keycloak Server URL:
https://sso.anqorithm.com/auth - GitHub Repository: https://github.com/anqorithm/fastapi-keycloak.git
Key Highlights
- FastAPI: A modern web framework for building APIs with Python.
- Keycloak Integration: Offloads authentication and authorization to a dedicated identity provider.
- Poetry for Dependency Management: Simplifies dependency management and virtual environments.
- Dockerized Application: Simplifies deployment and ensures consistency across environments.
- Token-Based Authentication: Secures API endpoints using access tokens obtained from Keycloak.
- JWT Token-Based Authentication: Secures API endpoints using JSON Web Tokens (JWT) obtained from Keycloak, ensuring authenticated and authorized access to resources.
Project Structure
Here’s the structure of the project we’ll be working with:
fastapi-keycloak/
├── src/
│   ├── __init__.py
│   ├── main.py
│   ├── controller.py
│   ├── service.py
│   ├── models.py
│   ├── config.py
│   ├── .env.example
│   └── .env
├── assets/
│   ├── Integrating FastAPI with Keycloak for Authentication.jpg
│   └── other images...
├── Dockerfile
├── docker-compose.yaml
├── pyproject.toml
├── poetry.lock
├── README.md
├── LICENSEsrc/: Contains the FastAPI application code.assets/: Contains images used in this article.Dockerfileanddocker-compose.yaml: For containerizing the application.pyproject.tomlandpoetry.lock: For dependency management with Poetry.
Setting Up Keycloak
Before integrating Keycloak with FastAPI, we need to set up Keycloak by creating a new realm, client, and user.
1. Access Keycloak Admin Console
Open your web browser and navigate to the Keycloak Admin Console at:
https://sso.anqorithm.com/auth/admin/Log in with your administrator account.
2. Create a New Realm
- Click on the Master realm dropdown on the left-hand side.
- Click on Add Realm.
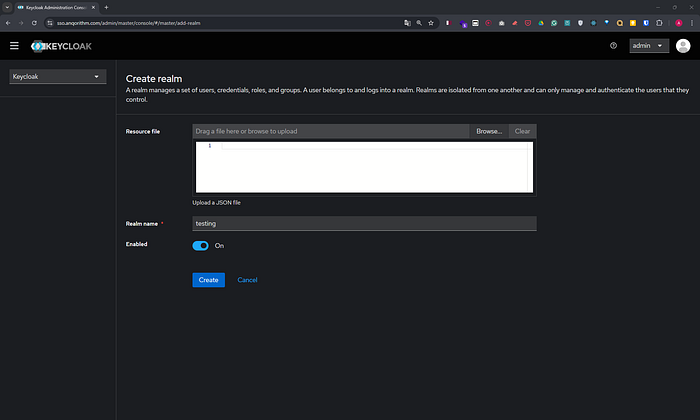
- Realm Name: Enter
testing. - Click Create.
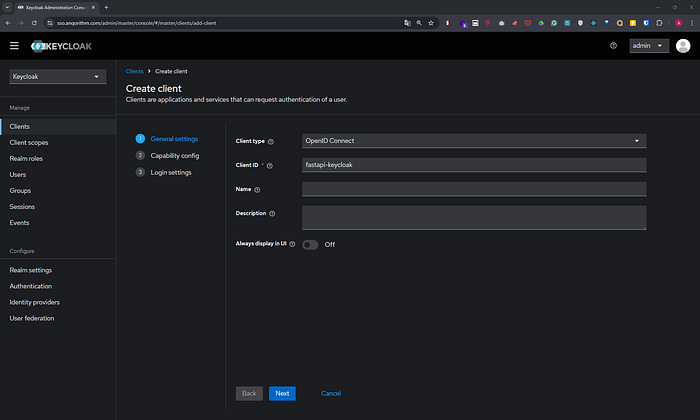
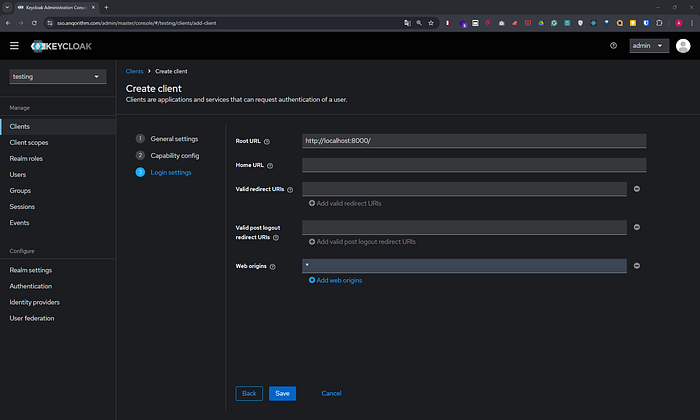
3. Create a New Client
- In the left sidebar, select Clients.
- Click on Create.
- Client ID: Enter
fastapi-keycloak. - Client Protocol: Ensure it’s set to
openid-connect. - Click Save.
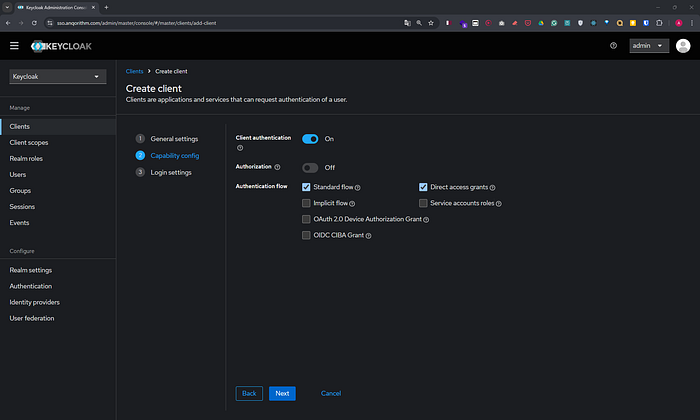
- Configure the client:
- Access Type: Set to
confidential. - Standard Flow Enabled:
ON. - Direct Access Grants Enabled:
ON. - Root URL:
http://localhost:8000/(or your FastAPI app URL). - Valid Redirect URIs:
http://localhost:8000/*. - Click Save.
4. Obtain Client Secret
- After saving, navigate to the Credentials tab.
- Your Client Secret will be displayed.
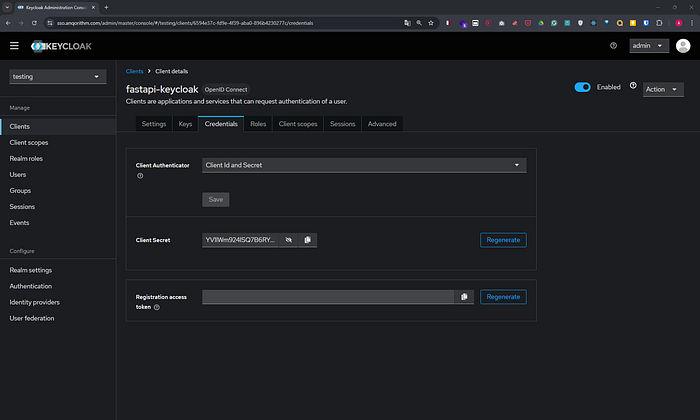
- Copy the Client Secret. You’ll need it for configuring your FastAPI application.
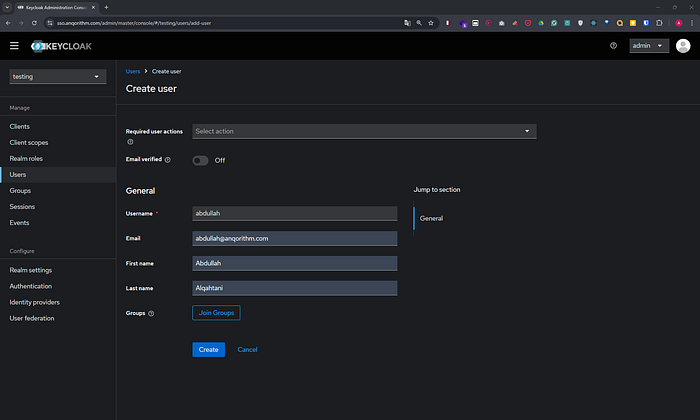
5. Create a New User
- In the left sidebar, select Users.
- Click on Add User.
- Username: Enter
your-username. - Email: Enter
your-email. - First Name:
your-first-name. - Last Name:
your-last-name - Set other optional fields as desired.
- Click Save.
6. Set User Password
- After saving the user, navigate to the Credentials tab.
- Set a password for the user:
- New Password: Enter a password.
- Confirm Password: Re-enter the password.
- Temporary: Set to
OFF. - Click Save.

Your Keycloak setup is now complete.
Setting Up the FastAPI Application
1. Clone the Repository
First, clone the repository and navigate into the project directory:
git clone https://github.com/anqorithm/fastapi-keycloak.git
cd fastapi-keycloak
2. Set Up Environment Variables
Copy the example environment file and update it with your Keycloak configuration:
cp src/.env.example src/.envEdit src/.env and set the following variables:
KEYCLOAK_SERVER_URL=https://sso.anqorithm.com/auth
KEYCLOAK_REALM=testing
KEYCLOAK_CLIENT_ID=fastapi-keycloak
KEYCLOAK_CLIENT_SECRET=your-client-secret- KEYCLOAK_SERVER_URL: The URL where your Keycloak server is accessible.
- KEYCLOAK_REALM: The realm you have configured in Keycloak (e.g.,
testing). - KEYCLOAK_CLIENT_ID: The client ID for your application in Keycloak (e.g.,
fastapi-keycloak). - KEYCLOAK_CLIENT_SECRET: The secret associated with your client.
Note: Replace
your-client-secretwith the actual client secret from your Keycloak client configuration. Ensure you keep your client secret secure and do not expose it in public repositories.

.env File3. Understanding the Application Code
Let’s dive into the code files and understand how they work together.
a. main.py
This is the entry point of the FastAPI application.
from fastapi import FastAPI, Depends, Form
from fastapi.security import HTTPBearer, HTTPAuthorizationCredentials
from src.models import TokenResponse, UserInfo
from src.controller import AuthController

# Initialize the FastAPI app
app = FastAPI()

# Initialize the HTTPBearer scheme for authentication
bearer_scheme = HTTPBearer()


# Define the root endpoint
@app.get("/")
async def read_root():
    """
    Root endpoint that provides a welcome message and documentation link.
    """
    return AuthController.read_root()


# Define the login endpoint
@app.post("/login", response_model=TokenResponse)
async def login(username: str = Form(...), password: str = Form(...)):
    """
    Login endpoint to authenticate the user and return an access token.

    Args:
        username (str): The username of the user attempting to log in.
        password (str): The password of the user.

    Returns:
        TokenResponse: Contains the access token upon successful authentication.
    """
    return AuthController.login(username, password)


# Define the protected endpoint
@app.get("/protected", response_model=UserInfo)
async def protected_endpoint(
    credentials: HTTPAuthorizationCredentials = Depends(bearer_scheme),
):
    """
    Protected endpoint that requires a valid token for access.

    Args:
        credentials (HTTPAuthorizationCredentials): Bearer token provided via HTTP Authorization header.

    Returns:
        UserInfo: Information about the authenticated user.
    """
return AuthController.protected_endpoint(credentials)- Endpoints:
GET /: Returns a welcome message.POST /login: Authenticates the user and returns an access token.GET /protected: A protected endpoint that requires a valid token.
b. models.py
Defines the data models used in the application.
from pydantic import BaseModel
from typing import Optional


class TokenRequest(BaseModel):
    username: str
    password: str


class TokenResponse(BaseModel):
    access_token: str
    token_type: str = "bearer"


class UserInfo(BaseModel):
    preferred_username: str
    email: Optional[str] = None
    full_name: Optional[str] = None
c. config.py
Loads the environment variables and initializes the Keycloak client.
from pydantic_settings import BaseSettings
from pydantic import Field
from keycloak import KeycloakOpenID

class Settings(BaseSettings):
    keycloak_server_url: str = Field(..., env="KEYCLOAK_SERVER_URL")
    keycloak_realm: str = Field(..., env="KEYCLOAK_REALM")
    keycloak_client_id: str = Field(..., env="KEYCLOAK_CLIENT_ID")
    keycloak_client_secret: str = Field(..., env="KEYCLOAK_CLIENT_SECRET")

    class Config:
        env_file = ".env"
        env_file_encoding = "utf-8"


settings = Settings()

keycloak_openid = KeycloakOpenID(
    server_url=settings.keycloak_server_url,
    realm_name=settings.keycloak_realm,
    client_id=settings.keycloak_client_id,
    client_secret_key=settings.keycloak_client_secret,
)

def get_openid_config():
    return keycloak_openid.well_known()
d. service.py
Handles communication with Keycloak.
from fastapi import HTTPException, status
from keycloak.exceptions import KeycloakAuthenticationError
from src.config import keycloak_openid
from src.models import UserInfo


class AuthService:
    @staticmethod
    def authenticate_user(username: str, password: str) -> str:
        """
        Authenticate the user using Keycloak and return an access token.
        """
        try:
            token = keycloak_openid.token(username, password)
            return token["access_token"]
        except KeycloakAuthenticationError:
            raise HTTPException(
                status_code=status.HTTP_401_UNAUTHORIZED,
                detail="Invalid username or password",
            )

    @staticmethod
    def verify_token(token: str) -> UserInfo:
        """
        Verify the given token and return user information.
        """
        try:
            user_info = keycloak_openid.userinfo(token)
            print(user_info)
            if not user_info:
                raise HTTPException(
                    status_code=status.HTTP_401_UNAUTHORIZED, detail="Invalid token"
                )
            return UserInfo(
                preferred_username=user_info["preferred_username"],
                email=user_info.get("email"),
                full_name=user_info.get("name"),
            )
        except KeycloakAuthenticationError:
            raise HTTPException(
                status_code=status.HTTP_401_UNAUTHORIZED,
                detail="Could not validate credentials",
            )
e. controller.py
It contains the logic for handling requests.
from fastapi import Depends, HTTPException, status, Form
from fastapi.security import HTTPBearer, HTTPAuthorizationCredentials
from src.models import TokenResponse, UserInfo
from src.service import AuthService

# Initialize HTTPBearer security dependency
bearer_scheme = HTTPBearer()


class AuthController:
    """
    Controller for handling authentication logic.
    """

    @staticmethod
    def read_root():
        """
        Root endpoint providing basic information and documentation link.

        Returns:
            dict: A welcome message and link to the documentation.
        """
        return {
            "message": (
                "Welcome to the Keycloak authentication system. "
                "Use the /login endpoint to authenticate and /protected to access the protected resource."
            ),
            "documentation": "/docs",
        }

    @staticmethod
    def login(username: str = Form(...), password: str = Form(...)) -> TokenResponse:
        """
        Authenticate user and return access token.

        Args:
            username (str): The username of the user attempting to log in.
            password (str): The password of the user.

        Raises:
            HTTPException: If the authentication fails (wrong credentials).

        Returns:
            TokenResponse: Contains the access token upon successful authentication.
        """
        # Authenticate the user using the AuthService
        access_token = AuthService.authenticate_user(username, password)

        if not access_token:
            raise HTTPException(
                status_code=status.HTTP_401_UNAUTHORIZED,
                detail="Invalid username or password",
            )

        return TokenResponse(access_token=access_token)

    @staticmethod
    def protected_endpoint(
        credentials: HTTPAuthorizationCredentials = Depends(bearer_scheme),
    ) -> UserInfo:
        """
        Access a protected resource that requires valid token authentication.

        Args:
            credentials (HTTPAuthorizationCredentials): Bearer token provided via HTTP Authorization header.

        Raises:
            HTTPException: If the token is invalid or not provided.

        Returns:
            UserInfo: Information about the authenticated user.
        """
        # Extract the bearer token from the provided credentials
        token = credentials.credentials

        # Verify the token and get user information
        user_info = AuthService.verify_token(token)

        if not user_info:
            raise HTTPException(
                status_code=status.HTTP_401_UNAUTHORIZED,
                detail="Invalid token",
                headers={"WWW-Authenticate": "Bearer"},
            )

        return user_info
Managing Dependencies with Poetry
Poetry is a tool for dependency management and packaging in Python. It allows you to declare the libraries your project depends on and manages them for you.
1. Installing Poetry
If you haven’t installed Poetry yet, you can do so using the following command:
curl -sSL https://install.python-poetry.org | python3 -After installation, ensure that Poetry’s bin directory is in your PATH. You can verify the installation by running:
poetry --version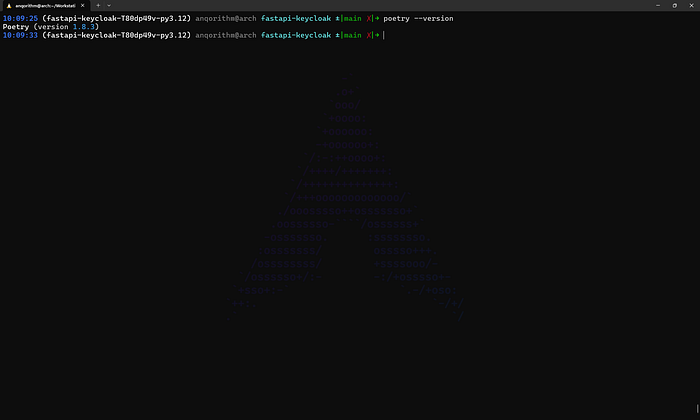
2. Using pyproject.toml to Manage Dependencies
The pyproject.toml file is where you specify your project's dependencies and other configurations.
Here’s the content of the pyproject.toml file:
[tool.poetry]
name = "fastapi-keycloak"
version = "0.0.1"
description = ""
authors = ["Abdullah Alqahtani <abdullah@lameh.ai>"]
readme = "README.md"
[tool.poetry.dependencies]
python = "^3.12"
fastapi = {extras = ["standard"], version = "^0.115.0"}
python-keycloak = "^4.4.0"
httpx = "^0.27.2"
pydantic = "^2.9.2"
pydantic-settings = "^2.5.2"
[build-system]
requires = ["poetry-core"]
build-backend = "poetry.core.masonry.api"
- Dependencies:
fastapi: The web framework.python-keycloak: Library to interact with Keycloak.httpx: For making HTTP requests.pydantic: For data validation.pydantic-settings: For managing settings using Pydantic.
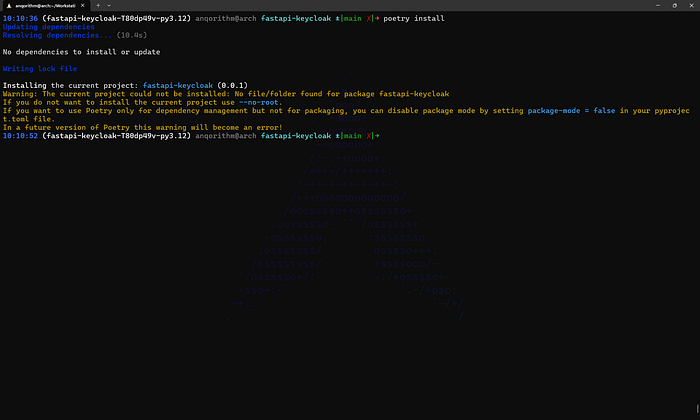
3. Installing Dependencies
Run the following command to install all dependencies specified in pyproject.toml:
poetry installThis command will create a virtual environment and install all the required packages.
4. Activating the Poetry Shell
To activate the virtual environment created by Poetry, run:
poetry shellThis command spawns a new shell within the virtual environment.

Running the Application
1. Running with Uvicorn
You can run the FastAPI application using Uvicorn, an ASGI server:
uvicorn src.main:app --reloadsrc.main:apppoints to theappinstance inmain.py.--reloadenables auto-reload on code changes.
2. Running with FastAPI CLI
Alternatively, you can run the application using the FastAPI CLI if you have it installed:
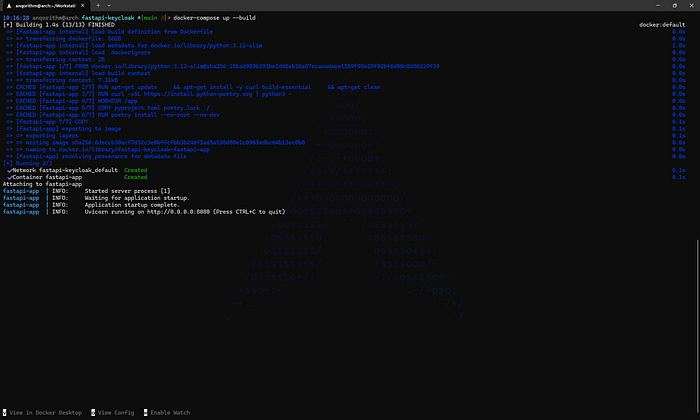
fastapi run src/main.py --reload3. Running Inside Docker
If you prefer to run the application inside Docker (as specified in the Dockerfile and docker-compose.yaml), use:
docker-compose up --buildThis command builds the Docker image and starts the container.
4. Accessing the Application
Once the application is running, it will be accessible at http://localhost:8000/.
Testing the Authentication Flow
Let’s test the authentication flow using the endpoints we have defined.
1. Accessing the Root Endpoint
Open your browser and navigate to http://localhost:8000/.
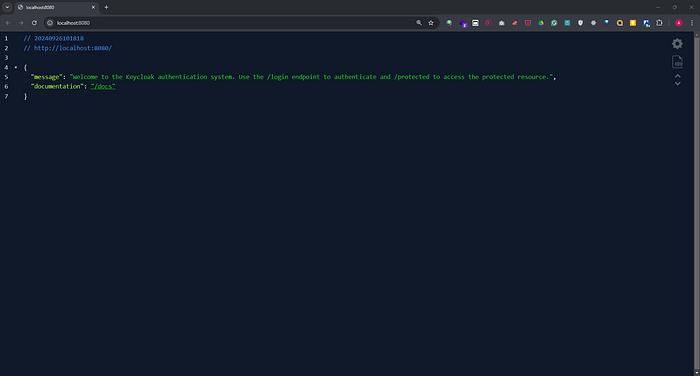
You should see a welcome message with a link to the documentation.
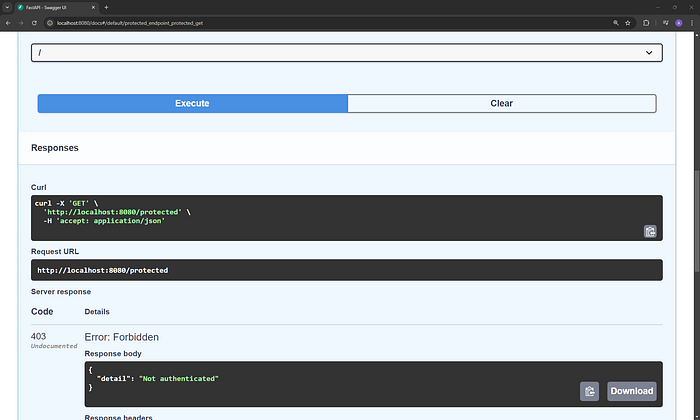
2. Accessing the Protected Endpoint Without Authentication
Try accessing the protected endpoint without a token:
curl -X GET http://localhost:8000/protectedResponse:
{
  "detail": "Not authenticated"
}
3. Authenticating with the /login Endpoint
Obtain an access token by providing your Keycloak credentials.
a. Successful Authentication
Use valid credentials to authenticate:
curl -X POST http://localhost:8000/login \
  -H "Content-Type: application/x-www-form-urlencoded" \
  -d "username=abdullah&password=Test#123456"
Replace abdullah and Test#123456 with your Keycloak user credentials.
Response:
{
  "access_token": "eyJhbGciOiJSUzI1NiIsInR..."
}
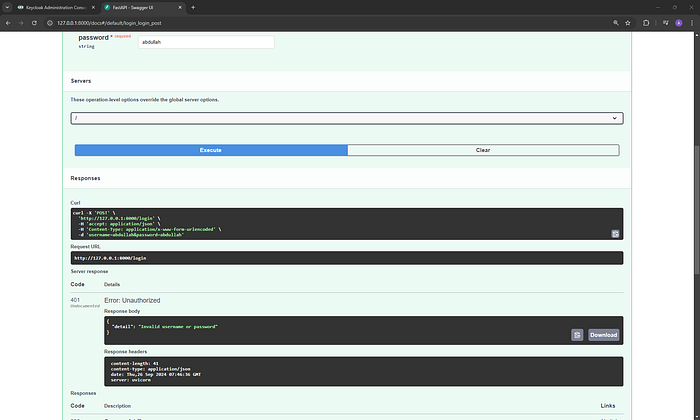
b. Failed Authentication
Use invalid credentials to simulate a failed login attempt:
curl -X POST http://localhost:8000/login \
  -H "Content-Type: application/x-www-form-urlencoded" \
-d "username=abdullah&password=abdullah"Response:
{
  "detail": "Invalid username or password"
}
4. Accessing the Protected Endpoint with the Token
Use the obtained access_token to access the protected endpoint:
curl -X GET http://localhost:8000/protected \
  -H "Authorization: Bearer your_access_token"
Replace your_access_token with the token you received.
Response:
{
  "preferred_username": "your-username",
  "email": "your-email@example.com",
  "full_name": "Your Full Name"
}
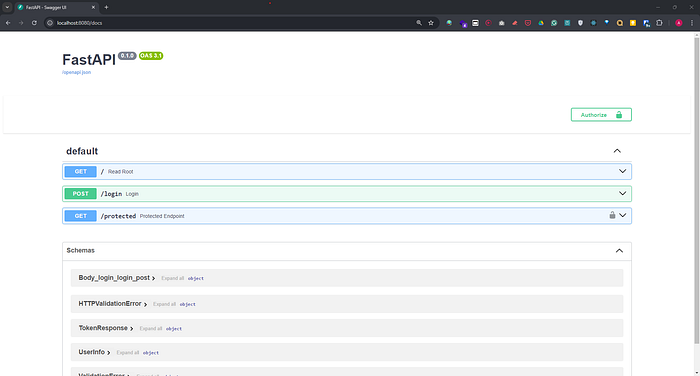
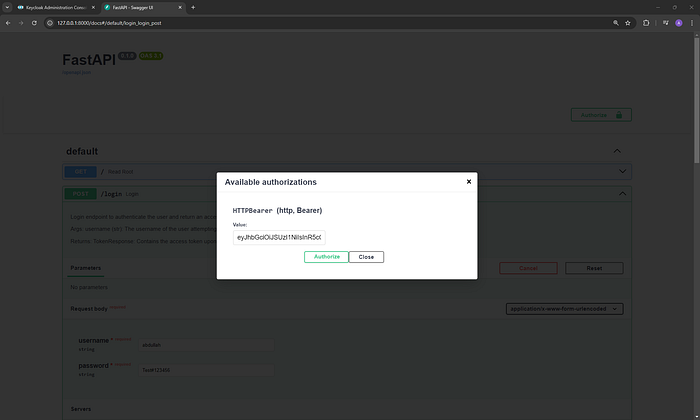
5. Using Swagger UI
FastAPI provides interactive API documentation at http://localhost:8000/docs.
You can test the endpoints directly from the Swagger UI.
Testing /login Endpoint in Swagger
- Click on the
/loginendpoint. - Click Try it out.
- Enter your username and password.
- Click Execute.
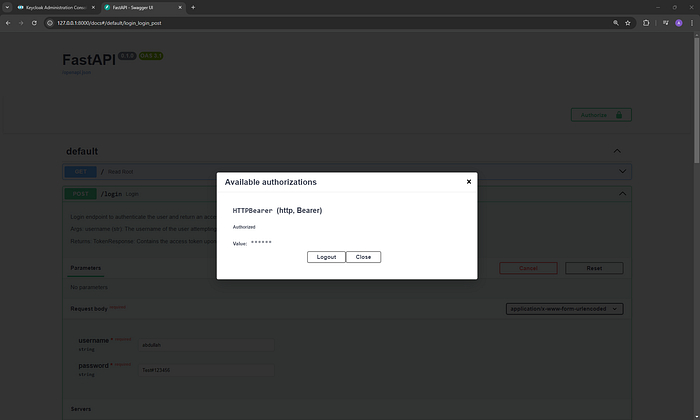
Testing /protected Endpoint in Swagger
- Obtain the access token from the
/loginresponse. - Click on the Authorize button (lock icon).
- Enter
Bearer your_access_tokenin the value field. - Click Authorize.
Now, test the /protected endpoint by clicking Try it out and then Execute.
Conclusion
FastAPI has been integrated with Keycloak, and dependencies are managed using Poetry. This setup includes on-premise security management, ensuring that authentication and authorization processes remain within the organization’s infrastructure. By utilizing OpenID Connect protocols, the system offers robust security features and better user management, all while providing greater control over data security, compliance, and internal policies.
Repository
You will find the source code for this article in the following GitHub repository
Contact Me
Feel free to connect with me on LinkedIn for further discussions or inquiries 😁.